
There are many reasons you might want to find out what GPU is powering your PC’s graphical output.
- If its performance feels slow, you might want to check if it’s normal for the particular GPU. If not, you could “fix” those performance problems with some tweaking.
- You might want to compare its specifications with other models before upgrading to ensure the one you’ll get will really be an upgrade.
- If a game fails to run or performs slowly, you might want to check if your GPU exceeds its “minimum requirements.”
Plus, it feels nice knowing more about your gear. But how can you find out more about your GPU? Let’s see how you can do it with the tools that come with Windows 11.
Check the Task Manager
As its name states, the Task Manager is Windows’ tool for managing running tasks and processes. However, you can also use it to monitor and get information about the parts of your PC hardware that primarily affect performance. And among those is also the GPU.
- Run the Task Manager by pressing CTRL + Shift + Esc simultaneously. Does it appear in its basic form that only presents simplified information? Click on More details on the bottom left of its window to “expand” it.

Task Manager’s “simplified” window - By default, you’ll be looking at the Task Manager’s Processes tab. Next, go to the Performance tab to check hardware info.
- On the left side of the Performance tab, you’ll see a list of your computer’s hardware. Scroll down to find your GPU, and click on it. The right side of the window will update, showing more information about the load put on the GPU. You’ll see its brand and model on the top right. You can then use those to search online for more information about your GPU.

Checking the GPU’s performance with Task Manager


Find your GPU in the Device Manager
Do you need more information than you can find in the Task Manager? Another Windows tool, the Device Manager, can provide you with much more info on your GPU.
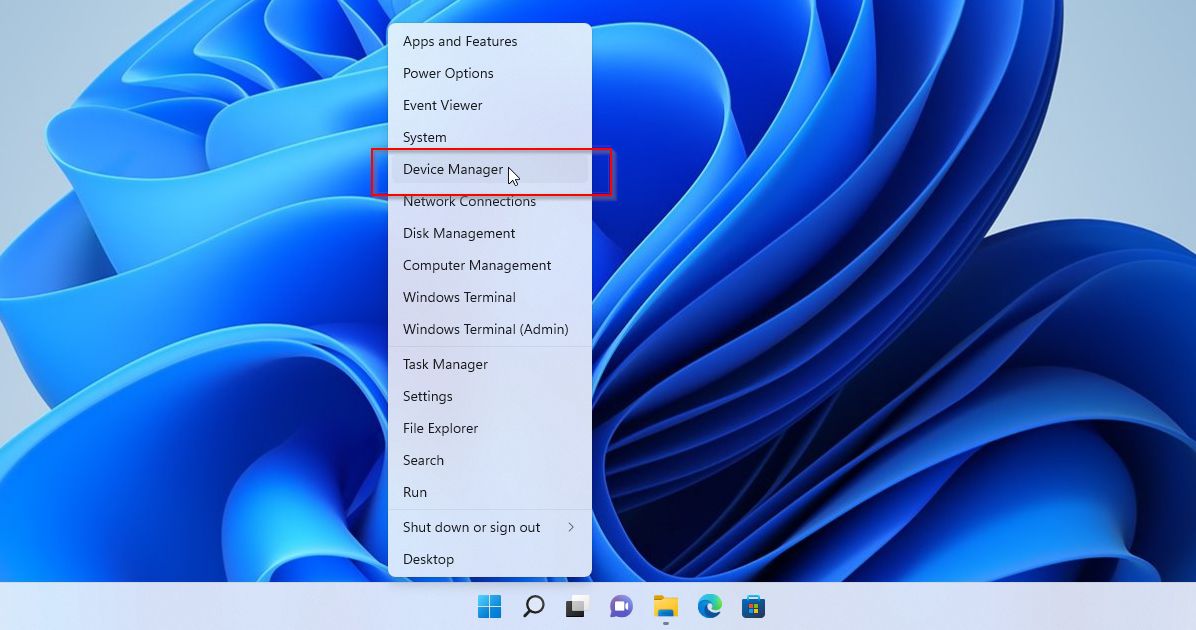
- Press Windows key + X, and choose the Device Manager entry from the menu that shows up.

Launch Device Manager from the Windows key + X quick menu. - The Device Manager window will launch, listing all hardware components and devices on your computer. Expand the Display adapters entry by clicking on the arrow on its right to find your GPU under it.

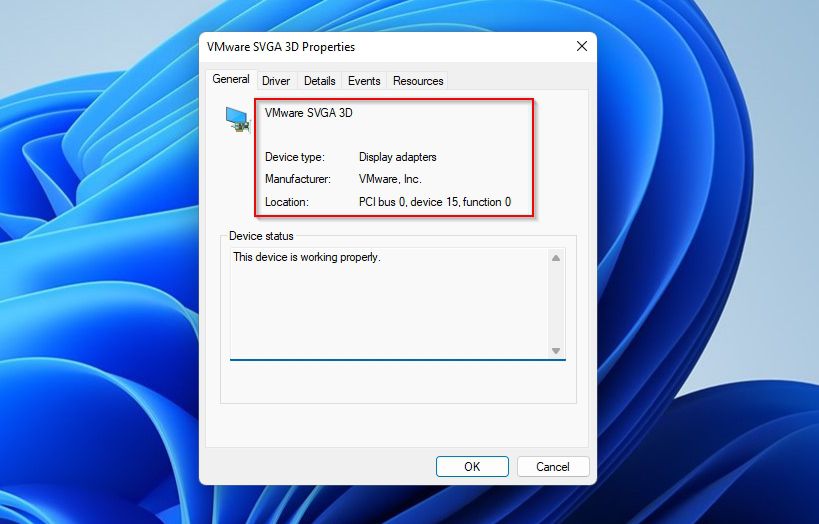
Display Adapters entry in Device Manager. - Double-click on the GPU listed under Display adapters or right-click on it and choose Properties. You’ll see a window with more information about the device.
Checking the GPU’s Properties from Device Manager. - Go to the Details tab to find more information about your GPU.
Find more about the GPU from Device Manager’s device Details Tab. - The preselected Device description entry will show you a value you can use to search for more information about your GPU. Still, in some cases, it might not be enough. For example, that descriptor might be “too generic” and not pinpoint the particular model. Thankfully, you can find more information, like more specific Hardware Ids, using the drop-down menu.
Find more info on the GPU through the Device Manager’s device properties drop-down menu.


Visit the Display Settings
The Task Manager might present too little information. The Device Manager is the opposite and a tad more complex. The Display Properties can work as an excellent middle ground between the two.
- Right-click on an empty spot on your Windows 11 desktop, and choose Display settings from the menu.

Select the Display Settings option by right-clicking on Windows 11’s desktop. - The Display section of the Windows 11 Settings window will open. Click on Advanced display under Related settings.

Windows 11’s Settings System Display page. - You’ll see your monitor(s) on the Advanced display page. Expand the entry of the one connected to the GPU for which you want to find more information. Then, click on the Display adapter properties for Display X (where “X” is the number corresponding to that monitor).
Checking the Display Adapter Properties from the Settings System – Display page. - On the Adapter tab of the window that will show up, you’ll find the primary ID of your GPU at the very top, under Adapter Type. Below that, you’ll see more info about it in the Adapter Information section. Then, click on the Properties button to find even more information about it.

Checking the GPU Adapter’s properties. - You’ll find yourself at a familiar window we also saw in the previous section. Its General tab will show less info than the Adapter Information section of the step above. However, as we saw, you can move to the Details tab and use the drop-down menu to learn more about your GPU.

Basic information about the GPU adapter on its General properties tab.


Check your GPU Driver’s Panel
For the two dominant GPU makers, NVIDIA and AMD, you can right-click on your desktop and choose the respective entry you’ll find on the menu that shows up.
- For NVIDIA GPUs, you’ll see an NVIDIA Control Panel entry. AMD GPUs will show an AMD Radeon Software entry instead. Choose it to access the GPU driver’s main panel.
- For NVIDIA GPUs, click on the System Information link on the bottom-left of the window. A new window will show up with all the info you might need to identify your GPU correctly.
- For AMD GPUs, click on the little gear icon on the top-right of AMD Radeon Software’s window, and choose System. Then, click on the More Details drop-down section to expand it and find out (much) more about your GPU.
Use the DirectX Diagnostic Tool
DirectX is a collection of multimedia APIs in Windows, used by software that needs to interact with your hardware. You can use the diagnostic tool that comes with DirectX to “read” more info about your GPU and its capabilities.
- There are many ways to run the DirectX Diagnostic Tool. For example, you can launch it directly from the Run command by pressing Windows key + R, typing “dxdiag” (without quotation marks), and pressing Enter. Or you can look for it using the same term, “dxdiag,” using the Windows Start Menu search function.

Locating DXDiag using Search. - The DirectX Diagnostic Tool window will show up on your screen. Its System tab, which you’ll be looking at, may be interesting, but it’s not what you’re seeking. Move to the Display tab instead.

DirectX Diagnostic Tool’s System tab. - On the Display tab, you’ll find all the necessary information for identifying your GPU. “Information” ranging from its Manufacturer and Chip Type to the DirectX “Feature Levels” it supports.
DirectX Diagnostic Tool’s Display tab, with helpful info about the GPU.


Use System Information
The GPU is an integral component of the PC as a “system.” Thus, you can find more information about it using the System Information tool.
- Click on the Start button and search for “information.” Locate the System Information tool, and launch it.

Locating the System Information Tool using Search. - By default, you’ll be looking at the System Information tool’s System Summary report. Expand the Components entry below it to find more info about your GPU.

System Information’s System Summary page. - Out of all listed hardware “components,” select the Display entry. The right side of the window will update to show more info about your GPU’s name, RAM, active drivers, etc.
Find more about the GPU from System Information’s Components Display page.


Know your GPU
Many people use their computer without knowing more details about its components – GPU included. However, learning more about your hardware is empowering.
By knowing more about your GPU, you can make an informed choice on whether it’s worth upgrading and choosing the best possible upgrade. In addition, you can better troubleshoot your existing hardware and ensure it’s not the reason a piece of software (or the latest game) malfunctions.
And now, you know about the many paths you can follow on Windows 11 to get all that information. No third-party tools, downloads, or jumping through hoops.